Creating a map key

Exercise 1.7: Create a map key

Map Maker doesn’t make keys automatically, and the automation tools that do exist take a bit of time to learn and to tune well.  Map Maker is orientated to making maps from the ground up.  This can be an advantage when analysing third part data at a large scale (a small area).  A legend for a small area map doesn’t require a full blown key, which takes up space and hinders the interpretation of a map.

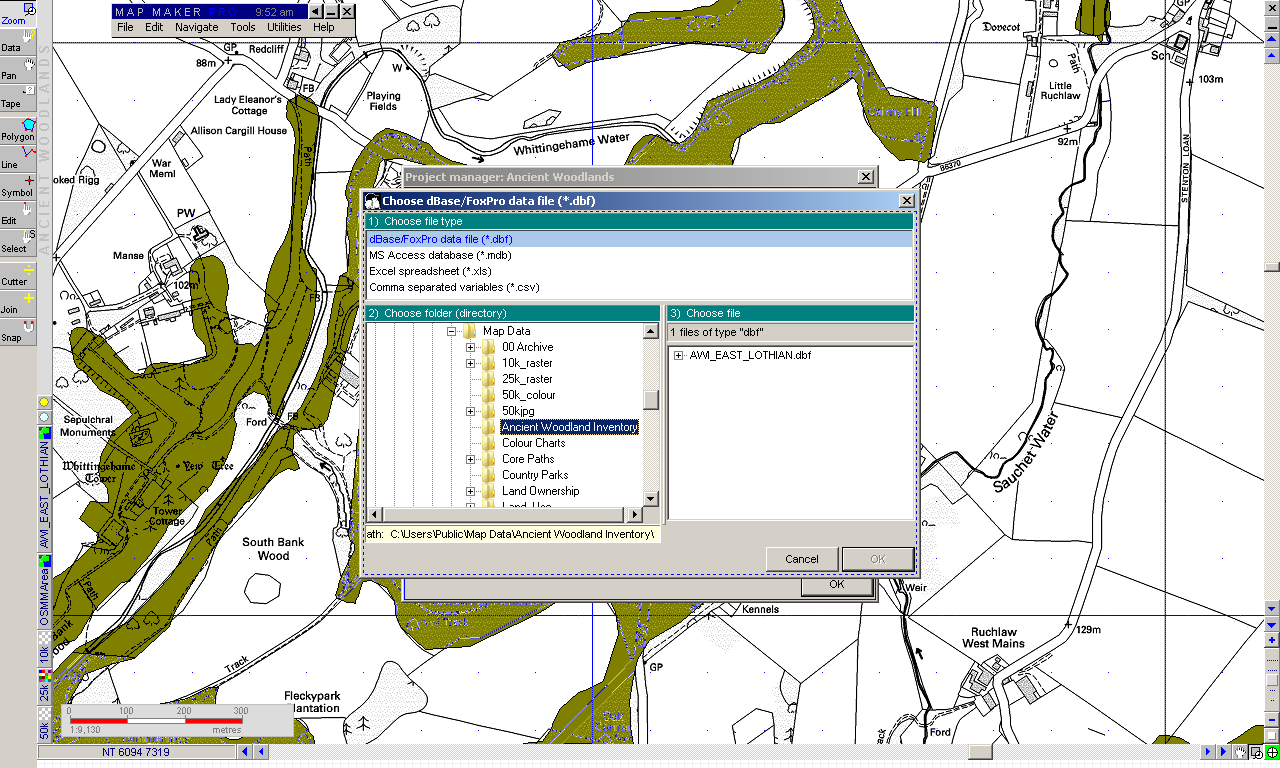
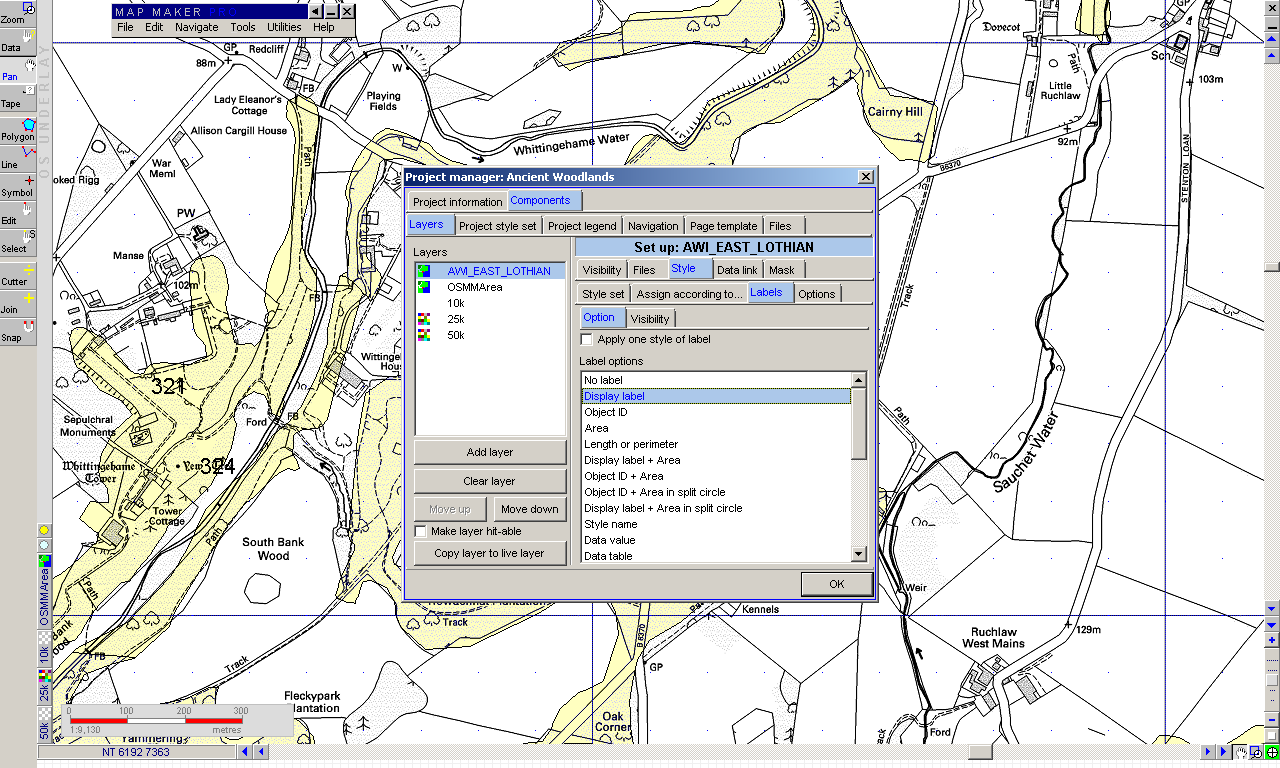
So it is back to the Project Manager.

Create Woodland Legend
  1. Click Project Legend. It should be empty.
  2. Select in succession 4 new polygon items. They’ll appear all the same at first, this is normal.
  3. Click on the colour and chose, sequentially our 4 key colours.
  4. Click on the Text to modify it, if necessary.
  5. Click on the Title tab and name it “Ancient Woodland Inventory”, then preview your new Legend.
  6. Click OK to close the Project Manager

Styling using a database

Exercise 1.6: Assign the style using the database

In the next step we are going to match our chosen style set with a suitable field in the database, so that it displays our scheme correctly.

Call up the Project Manager again.

  1. Click Assign according to … tab and then select Database
  2. Chose the only available database (.dbf) and hit OK
  3. Chose the Link Column : Site Id (any unique id will do, but sometimes you’ll have to know your data to chose appropriately) and then click OK
  4. Next chose the column to display ANTIQUITY towards the bottom of the pick list. Do not click OK quite yet!
  5. You must switch tab and select the Filter data in … ANTIQUITY tab and create a New filter, that you will name tree.txt and save on your desktop.
  6. A simple key will pop up with four woodland categories. Anything else means you have probably selected the wrong field.
  7. When you are happy you have the right field, close the dialog by clicking OK.
  8. Click OK once more to close the Project Manager.

The gallery below sequences the main events.

Removing labels & changing styles

Exercise 1.5: Remove the labels and change the style

By default, the new layer (AWI_EAST_LOTHIAN) uses the Project Style Set to colour the Polygons. This can have unpredictable results – strange colour schemes and labels, but no harm is done as we are going to change it in the next step.

Managing styles is the subject of a full tutorial on its own, but to get you going here is how.

Remove Woodland Inventory Label
  1. Call up the Project Manager. The right hand pane has a range of configuration options set out as tabs.
  2. Chose the Labels sub-tab and select No Label and then OK.
  3. If you are feeling adventurous, come back to this stage after you’ve completed all the exercises and see if you can chose a different display label from the database (Hint select Data Values).

Next we are going to change the default project style.  Creating a fresh one takes time, so we are going to use one we made earlier.

  1. From the Project Manager, select the tab after Layers called Project Style Set
  2. Now click the sub tab Style Management and select Import style set and overwrite
  3. Navigate to the folder Ancient Woodland Inventory, where we picked up the original data, and select the style file and click OK
  4. Click OK
  5. Note that the map has now changed, but we still haven’t told it how to apply our new colour scheme.

    Import Woodland Inventory Style
    Import Woodland Inventory Style

Adding the Ancient Woodland Layer

Exercise 1.4: Add the Ancient Woodlands Layer

Now call up the Project Manager using the space bar. There are different ways to call up the menu bar, but by the end of this tutorial you’ll remember it!

The Components view is shown by default, with Layers tab visible. NB that each tab selection changes the size of the dialogue box, which can confuse!

Before you do anything else, click the Project Information tab, and look through the configuration options available. Give the project a title if you wish now or return to the Components pane.

Add Woodland Layer
Add Woodland Layer

The left hand pane consists of layers in the current project. Click Add layer to add the Woodland Inventory, which is stored in in the folder: Public / Map Data / Ancient Woodland Inventory.

If you cannot see the Public folder, click the + signs to expand each folder until you find Public, which is normally accessed via the desktop (Vista and XP) or under the C: drive in the Users folder (Windows 7). Using the arrow keys to navigate the Map Maker file menus can be much faster than using a mouse (up and down to scroll through the folders, left and right to expand and close folders.) Try it.

Now, if the folder appears to be empty it is because there isn’t a file of the appropriate type. In this case, there is no .dra file (the native Map Maker vector format) so we are going to look for a .shp file, by selecting ArcView Shape file.

The Woodland Inventory Layer

You may need to click the selector once or twice to make sure it appears. Once the file appears and you’ve selected it, the OK button will be highlighted and you can proceed to the next stage, so click OK.

Here’s what you should see:

Navigating to Whittinghame Woodlands

Exercise 1.3: Navigate to Whittinghame House Woodlands

Now navigate using the zoom and pan tools to the area around Whittinghame House.

Whittinghame House Project Example

Select an area so that Lady Eleanor’s Cottage is roughly in the top left corner and Ruchlaw West Mains in the bottom right hand corner.

You may have noticed that the OS map changed from 1:50k to 1:25k (both colour maps) and then to 1:10k (a black and white map). Your final view should be 1:10k and look like the image on the right – click Esc(ape) to reclaim the screen: