Editing lines and polygons basics

Edit Map Maker Object

You’ve created some lines or polygons and now you need to correct them.

(If you’ve saved your data, you will have to first reload it into the Live Layer.)

There are three dimensions to think about: selecting objects, editing objects, and editing attributes.

Selecting objects is an option from the Context Menu, under Edit or just click on the left hand toolbar button.

There are 2 tools the Select tool and the Edit tool.  The Select tool is quite powerful and handy for quick deletes and a host of other operations.  Selection options include

  1. select a single object
  2. drag a square net
  3. hold down SHIFT key to select several objects (and perform operations)
  4. hold down CONTROL key and draw around a selection
  5. hold down C key and draw a circle around a number of objects

Operations that you may perform include:

  1. copy the selection
  2. cut selection (for use in a new project)
  3. delete the selection
  4. save the selection

The selection manager can be invoked from the Edit Menu and provides a wide range of additional options, which will be described later.

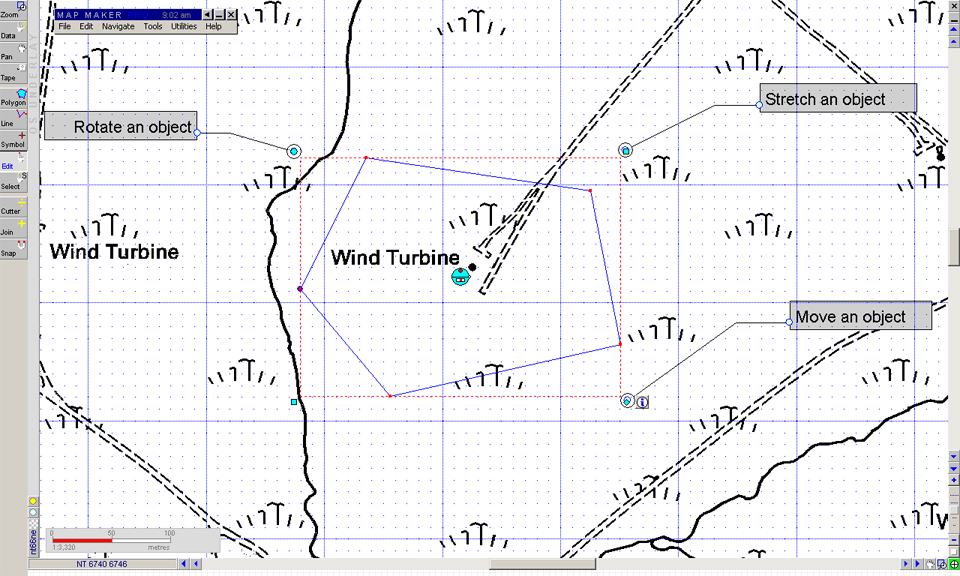
Editing object options are available from the left hand toolbar or short-cut CTRL+E takes you to edit object.  Double click the object.

The main Edit options are described below:

  1. drag the blue circle rotates the object
  2. the blue squares stretch the object
  3. the blue diamond to move the object

also

  1. the info button calls up the object parameters
  2. the blue label locator justifies, rotates and sizes the label, if shown
  3. the red vertices can be added to or deleted (click and drag;  select delete)
  4. the corder vertices are important in rotation

But you can also change the shape of the polygon by selecting a vertex and dragging it, delete a vertex by hovering over it, create a vertex by clicking  on a line.

To complete your edits click somewhere outside of the edit area and you are done.

Editing object attributes is a single click away if you are in Edit mode.  If not, click CTRL+E and single click the object whose attributes you wish to edit.

Delete file failed

Delete file failed
Delete file failed
Delete file failed is a common error that appears to follow a range of other errors. Temporary files are created by Map Maker in the background. If an error occurs access to the temporary file is interrupted for some reason and this error is generated and may recur throughout a session.

Solution

Save any work you have done, including Live Layers. If you are working on Styles, make sure you export a set. Restart Map Maker.

List index out of bounds (4)

List out of bounds
List out of bounds
This error can occur when you are moving items up or down in the Style Manager.

Move too far and this error is generated, the number seems to represent a position that no longer exists (-1 if you are moving up the way).

If you’ve created a new style, you may find it has dissappeared. 

Continuing working may make the error recur.  Save project

Drawing polygons with style

Polygons Styled on the Fly

Drawing polygons is much like drawing lines.  Click the polygon draw tool and click each vertex (corner, or suitable bend in a curve) until you are ready to close the polygon with a double click on the start node, OR just right click and automagically it will find the start node. As with line drawing you can correct errors using backspace.  Esc(ape) will delete your current drawing, but not the earlier polygons.

Once you’ve closed a polygon, you can chose the basic attributes as with a Line feature. In the Line example, we didn’t explain the edit project style set option, or how to create a new style.

When you create a set of lines or polygons you will want to extend the preset styles or re-style the default style set entirely.  Take care not to inadvertently overwrite your default style, the modifications will alter subsequent projects you create. Either permanently modify the project’s defaults, call up another style to use or create a specific set to use / re-use in this and future projects.

The presets are handy but basic, but making your own requires a bit of thought, simply, because each style set must be designed with presentation in mind. When entering data, it is tempting to style as you go, but unless you are entering a very small amount of data it pays to devise your styles before you start entering data or apply a set after you have entered it (but only if the number of styles matches your defaults).

In the dialogue box, instead of picking an existing style you edit the project style set.  Then, remembering to first go to the Style Management tab, add or delete styles to match the number you need.  Unless you are recycling a style set, you may as well delete the lot bar one (the last one cannot be deleted.)

Once the new styles are added, they won’t look right straight away, you need to configure each one.

You need to go to the Style Edit tab to edit them.

Take care, because each style carries details across other vector types.

A bit confusing but your line style influences the polygon boundary style with the same name.  The best way to think about this is that Trees can occur as a polygon (a woodland), a line (a field boundary or hedge), a point (a single tree, or cluster of trees).