Projects

While you CAN get by in Map Maker without using Projects for a while, before long creating maps from scratch becomes a chore even if you only work from a small number of base projects.  If you are new to mapping software, projects are neat as they let you explore other’s maps and data more readily.

The Map Maker Project Manager

Projects have a .geo file extension and store a set of file references (your data) and important details, i.e. the styles associated with your project.

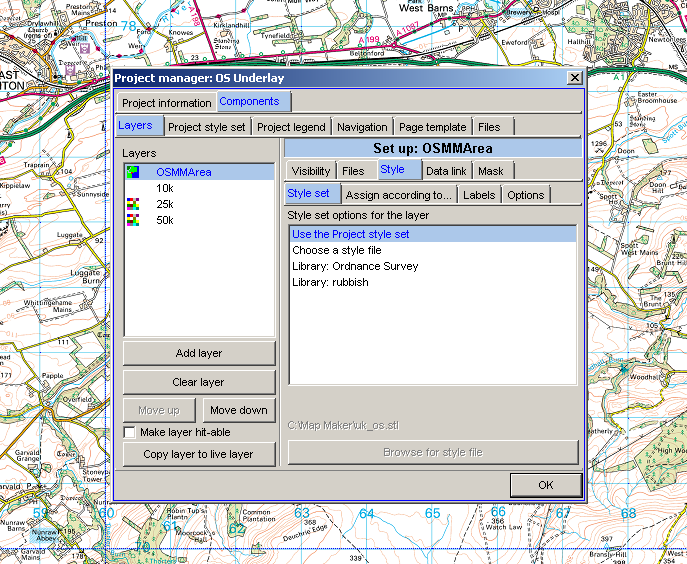
When you open up Map Maker it is configured to read in 4 OS map base layers covering a range of scales below 1:50k.  The  layers are configured to drop in and drop out of view depending on your zoom level.  You can change the behaviour to suit or remove any superfluous layers. More about this later.

Use any project as starting point for your own work, but remember first to give your new project a unique name and store it in your own personal space.  To see what projects are available  File > Open Project and then Browse if the recent file list is incomplete.

To start your own project from new, File > New Project gives you the option of using the information in a directory or folder or from a .dra file (the native Map Maker format for vector map data).  More about this later.

In Map Maker the Space Bar is used to invoke the Project Manager that we’ll use throughout this exploration of Map Maker.

*** Things to remember ***

Never save or overwrite any core project files or anyone else’s for that matter – create your own as soon as you start work.

You can only work on one project at a time.

If you keep losing style information or default styles get over-ridden, you are probably not saving projects correctly or need help with styles.

When you are working within a project, but say annotating a map layer it is easy to neglect saving your project while you are focused on your .dra layer.

It is easy indeed too easy to clear your project without Map Maker prompting you to save.  Frustrating, so save projects regularly.

Templates are edited like projects, and will clear a current project.

Map Making Guides

Step Guides for Map Maker and Arc Gis Java are designed to help you get up to speed with each application, without burdening you with too much GIS theory in one go.

quicker-by-farWe will publish chapters in groups of 4-6 articles that can be tackled in fairly short sessions and at your own pace, over a period of hours or days to suit your learning pace.

Use the Main Menu to access each chapter and use the Side Menu or Navigation to browse the individual chapters.

When you navigate the chapters, the most recent article should appear first.  If you want to run through each lesson in order navigate using the Sidebar Menu or Navigation buttons.

The screen

The Map Maker Screen

You’ve started up Map Maker and are already confused by the unconventional layout, which obscures all your other programs.  The floating menu has now disappeared and all you can do is zoom out!  And now that pointy tool doesn’t seem to do anything at all.

If everything is working as it should, the default project is an OS map of Dunbar and District.  There are 4 OS maps associated with this project, for you to uncover in a while.

The Zoom tool is in fact a Zoom to box tool and zooms out unless you select a box by clicking and dragging.  The box is rectangular to reflect your screen dimensions.

The plain point tool doesn’t actually do anything, to distinguish it from mapping tools that draw polygons and lines etc.  More about these later.

Back to the screen layout.  If you ever need to access another program you can minimise Map Maker via the menu bar or the top right hand corner.  To reactivate a docked Menu Bar click the vertical blue Menu – the docking facility is rather handy when you need to declutter to perform a clean screen grab.)

Windows programs can be accessed at all times by using the combination Alt+Tab. Try this and slowly scroll through your open programs and release when you hit the one you want to access.  You’ll need to learn this to skip between this text and Map Maker

Note the following:

  • the big buttons on the left of the screen
  • the mini buttons in the bottom right hand corner
  • the floating / dockable menu bar
  • the scroll bars with extended options
  • and finally, bottom left,  the map layers area.

More about all of these shortly, but for now just hover the pointer tool over the buttons to see what they all do.

File Management

Data sets can be quite simple, but in most cases will include one or more of the following

Vector data

  • a polygon file (in Map Maker this is a .dra file in Arc this is a .shp)
  • a database file (a .dbf file)

depending on where the data were sourced you may have a collection of other files. Do not edit these or try to open them.

Raster Data

  • an image file (typically .tif or .jpg a picture file)
  • a world file (.tfw or .jgw contains the geo-referencing co-ordinates without which your .tif file cannot be tiled correctly)

Again there may be a guddle of files in addition to these.  I most cases they do no harm, so leave them alone.

In addition to the basic data files, there may be project files:

  • .geo files are created by Map Maker
  • .axl files are created

When you make a map, for printing or web publication you may want a legend and a key.  In Map Maker this  information is stored separately.  Template files (for printing) are also stored separately.

It is therefore important that you keep your own project data well-organised.  Try and keep all the files you are creating in your own personal space or you may find it gets abused by someone else sharing the same data sets.

You may also create a number of working files when making maps from scratch or annotating maps.  When using Map Maker  it is wise to save working copies frequently and incrementally.  In other words using a version number to create a new copy every so often or on every save, if you are really paranoid.  This should be a feature really and there should be an decent layer save function.