All Articles

Navigation

Navigation Options & Context Menu

Navigation in Map Maker is a bit unconventional, but once learnt is powerful.

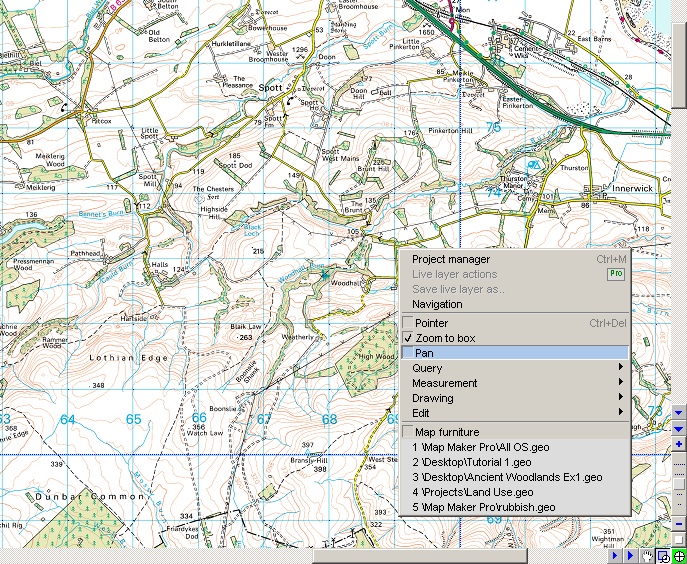
The context menu gives you easy access to the basic navigation options.  Right-click anywhere on the map or blank window.  If you have been using Arc GIS you’ll see many more options, but only 2 relate to navigation.

The context menu is handy.  If menus and buttons are hidden (the declutter options have been activated), the context menu will save you.  Other basic navigation options are detailed at the foot of this article, but the 2 important ones are Zoom to box and Pan.

Zoom to box

Zoom in by selecting an area with the box tool.  Click, hold the mouse button down, drag the selection box and then release.  By contrast, a single click zooms out – get used to this now.  Frustrating at first, you’ll see that it opens up the possibility of correcting your zoom area quite quickly.

You’ll see that the zoom box tool remembers the previous extent.  Zoom in incrementally and the zoom out one step at a time.

Pan

Is a conventional drag map tool.  Click and drag in any direction.

Both tools can be accessed via:

  • the context menu (right click)
  • the large buttons (top left)
  • the small buttons (bottom right)
  • Tools Menu (the floating menu)

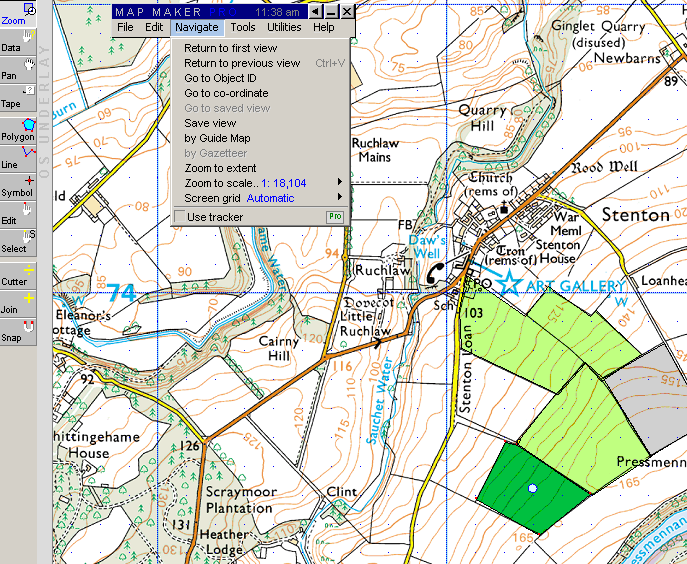
Other navigation options

As well as Zoom to Box and Pan there are other options – you may find these useful:

  • saved views (save a view and come back to it later)
  • guide map (mini button bottom right hand corner highlighted Navigation)
  • zoom to extent (above the Navigation button)
  • zoom presets (various options above the Navigation button)
  • pan using arrow keys
  • pan using the scroll bars (various options)

Advanced navigation options are available from the Navigation menu, including the ability to go to an Object Id, a co-ordinate, return to the previous view, and return to the first view. If desired gazateers can be created, but are somewhat limited compared with online tools that are increasingly available.

Advanced Navigation Map Maker
Saving Views Navigation Menu

Projects

While you CAN get by in Map Maker without using Projects for a while, before long creating maps from scratch becomes a chore even if you only work from a small number of base projects.  If you are new to mapping software, projects are neat as they let you explore other’s maps and data more readily.

The Map Maker Project Manager

Projects have a .geo file extension and store a set of file references (your data) and important details, i.e. the styles associated with your project.

When you open up Map Maker it is configured to read in 4 OS map base layers covering a range of scales below 1:50k.  The  layers are configured to drop in and drop out of view depending on your zoom level.  You can change the behaviour to suit or remove any superfluous layers. More about this later.

Use any project as starting point for your own work, but remember first to give your new project a unique name and store it in your own personal space.  To see what projects are available  File > Open Project and then Browse if the recent file list is incomplete.

To start your own project from new, File > New Project gives you the option of using the information in a directory or folder or from a .dra file (the native Map Maker format for vector map data).  More about this later.

In Map Maker the Space Bar is used to invoke the Project Manager that we’ll use throughout this exploration of Map Maker.

*** Things to remember ***

Never save or overwrite any core project files or anyone else’s for that matter – create your own as soon as you start work.

You can only work on one project at a time.

If you keep losing style information or default styles get over-ridden, you are probably not saving projects correctly or need help with styles.

When you are working within a project, but say annotating a map layer it is easy to neglect saving your project while you are focused on your .dra layer.

It is easy indeed too easy to clear your project without Map Maker prompting you to save.  Frustrating, so save projects regularly.

Templates are edited like projects, and will clear a current project.

Map Making Guides

Step Guides for Map Maker and Arc Gis Java are designed to help you get up to speed with each application, without burdening you with too much GIS theory in one go.

quicker-by-farWe will publish chapters in groups of 4-6 articles that can be tackled in fairly short sessions and at your own pace, over a period of hours or days to suit your learning pace.

Use the Main Menu to access each chapter and use the Side Menu or Navigation to browse the individual chapters.

When you navigate the chapters, the most recent article should appear first.  If you want to run through each lesson in order navigate using the Sidebar Menu or Navigation buttons.

The screen

The Map Maker Screen

You’ve started up Map Maker and are already confused by the unconventional layout, which obscures all your other programs.  The floating menu has now disappeared and all you can do is zoom out!  And now that pointy tool doesn’t seem to do anything at all.

If everything is working as it should, the default project is an OS map of Dunbar and District.  There are 4 OS maps associated with this project, for you to uncover in a while.

The Zoom tool is in fact a Zoom to box tool and zooms out unless you select a box by clicking and dragging.  The box is rectangular to reflect your screen dimensions.

The plain point tool doesn’t actually do anything, to distinguish it from mapping tools that draw polygons and lines etc.  More about these later.

Back to the screen layout.  If you ever need to access another program you can minimise Map Maker via the menu bar or the top right hand corner.  To reactivate a docked Menu Bar click the vertical blue Menu – the docking facility is rather handy when you need to declutter to perform a clean screen grab.)

Windows programs can be accessed at all times by using the combination Alt+Tab. Try this and slowly scroll through your open programs and release when you hit the one you want to access.  You’ll need to learn this to skip between this text and Map Maker

Note the following:

  • the big buttons on the left of the screen
  • the mini buttons in the bottom right hand corner
  • the floating / dockable menu bar
  • the scroll bars with extended options
  • and finally, bottom left,  the map layers area.

More about all of these shortly, but for now just hover the pointer tool over the buttons to see what they all do.